- Premiere Tutotial
How to Deinterlace in Premiere/FilmoraPro/VLC Easily
May 09,2019• Proven solutions
There are instances where you will notice a video that has a shaky section when you freeze the frame or you attempt to slow it down. The issue may not be noticeable when you were playing it at full speed, but freezing or slowing it down will show that some frames appear too shaky to properly view. Using deinterlace, you can fix this issue.
Never heard of deinterlacing before? We will show you how to use deinterlace in Premiere and deinterlace in VLC to eliminate the issue.
- Part1: The Difference between Deinterlacing and Interlacing
- Part2: How to Deinterlace in Premiere
- Part3: How to Deinterlace in VLC
Part 1: The Difference between Deinterlacing and Interlacing
Deinterlacing: The process of deinterlacing involves taking an interlaced video, which includes analog TV signals or 1080i signals, into a non-interlaced, or progressive, form. Interlaced video frames have two sub-fields that are taken within a sequence. These sub-fields are sequentially scanned in odd and even lines within the image sensor. Progressive videos, on the other hand, simply go line-by-line to make one single frame so fitting the odd and even rows together (interlacing) is not necessary.
In most instances, a viewer is not going to notice that a video is interlaced. But when the clip is slowed down or a specific frame is frozen, the single field may not distinguishable. In these instances, it may be necessary to deinterlace the image so those pairs of interlaced fields can be replaced by a single frame that is non-interlaced. It is possible to deinterlace in Premiere and deinterlace in VLC, two popular video programs.
Interlacing: Before going into the process of deinterlacing in Premiere and VLC, it is important to understand how interlacing occurs. An interlaced video is one where the perceived frame rate of the video is doubled without needing to use up extra bandwidth.
The video has two fields of a video frame that were captured at different times. The result is that a viewer sees improved motion perception, while flicker is also reduced.
For instance, a television or monitor that goes up to 60 frames per second will be able to display videos that have 50 fields scanned every second, with 30 being even and 30 being odd.
These two sets of 30 fields are linked to result in a full frame every 1/30th of a second (30 frames per second). But the interlacing results in a half frame every 1/60th of a second (60 frames per second).
Recommended: How to Deinterlace in FilmoraPro - Easier
If you want to deinterlace video easily, here we recommend using FilmoraPro. It is designed for pros or semi-pros who want to improve video editing skills quickly. You can deinterlace video in FilmoraPro to have a high quality video by dragging and dropping. Check the steps below.
- Import video to FilmoraPro and drag it to timeline.
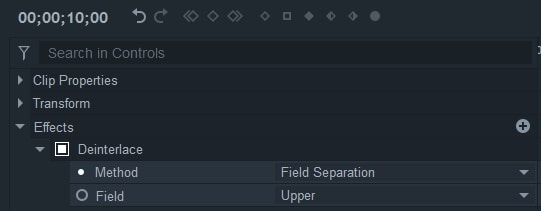
- Search "deinterlace" in the effects tab. You will see deinterlace in the Video Clean-up tab. Drag it onto video clip.
- Go to controls panel. Here you can adjust deinterlace method and field. Check FilmoraPro guide to know what the terms mean. Download it now to have a try (free)!

Part 2: How to Deinterlace in Premiere
If you are using Adobe Premiere, you can easily deinterlace a video. Open up the program and then a video project that you are hoping to tweak.
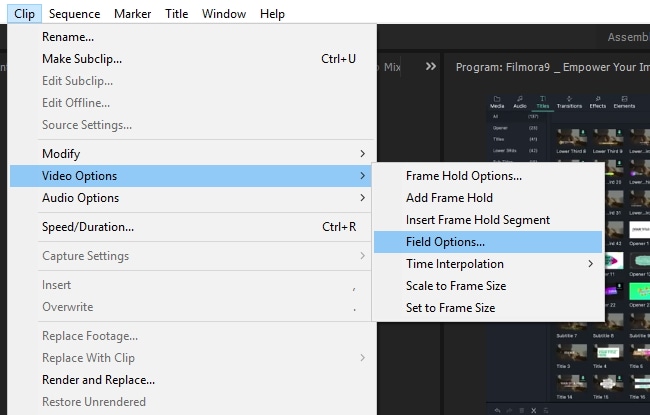
Take the footage that you want to edit, drag it into your timeline and then use the menu to deinterlace. You will select Clip, Video Options and then Field Options.
Now you have the Field Options window that you can use to select Flicker Removal. This is a good option if you have a short clip with minimal motion. You can also select Always Deinterlace which will scan your videos and remove half the frames that are not needed. It is a bit of a lengthier process, but it will ensure that your video is high quality. It is the best option for content that has more motion.

Part 3: How to Deinterlace in VLC
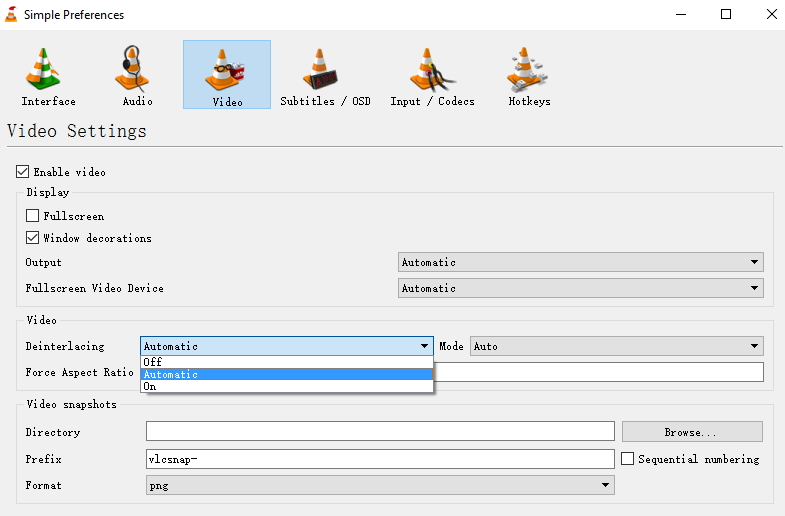
Open up VLC and start playing the video that you want to see. Pause it and go up to Tools. Go down to Preferences and then Video. You can choose between three options within Deinterlacing - Off, On or Automatic. Then save so that it will happen each time you are watching content.
VLC does have more advanced options for users who understand the different deinterlacing modes within the program. You can go to Tools and Preferences, and then select all in the show settings menu. Now you can go to Videos, Filters and finally Deinterlace. You will see many options, such as Blend, Bob, Yadif, Yadif (2x) and Linear.

Conclusion
Now that you have understood the difference between interlaced and deinterlaced videos, you can understand the purpose that both effects serve. You will also be able to effectively deinterlace in two popular video programs, Adobe Premiere and VLC. Deinterlacing in Premiere helps when you are creating videos, while VLC deinterlacing is handy for watching content.
Bring up your video to a professional level with straightforward tools.
Try It Free Try It Free


Liza Brown
chief Editor
0 Comment(s)